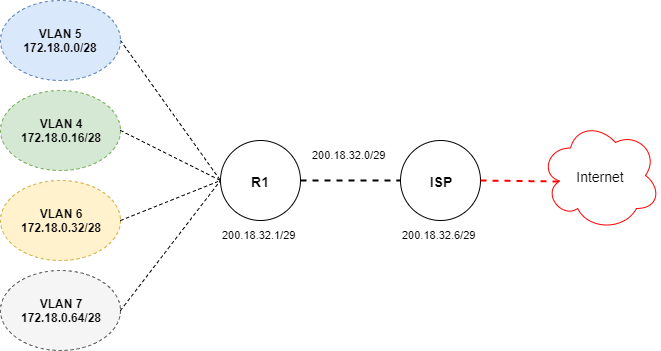
In most cases NAT translation is going to handled by the Corporate Firewall, but there certain situations or scenarios that lend themselves to creating NAT translations directly off a Router. One situation that comes to mind might call for the need to translate address between Network segments due to a lack of address space. Another might be the need to translate address to a Server farm for added security or again the need for address conservation.

Address Translation Terminology
Inside Local Address
- The IP address assigned to a host on the inside network
Inside Global Address
- Public IP address assigned by the Service Provider
Outside Local Address
- The IP address of an outside host as it appears to the inside network
Outside Global Address
- The IP address assigned to a host on the outside network by the host owner
Personally all the above terminology has always been vary confusing to me. At first glance one would naturally assume that anything on the inside would be referred to as inside, and anything on the outside would be referred to as outside. Well of course not that would be completely ridiculous. At any rate for this simple example I’m going to translate or overload the 4 inside address to 1 of the ISP Public address on the outside.
Because all 4 VLANS are directly connected via 802.1Q trunks there is no need for any dynamic routing protocols to be configured or running on Router R1. Remember that directly connected networks have an administrative distance of 1 so reaching these 4 networks without a dynamic routing protocol is not a problem.
Now lets create a single default static route pointed toward the ISP.
R1#configure terminal
R1(config)#ip route 0.0.0.0 0.0.0.0 200.18.32.6
R1(config)#exit
R1#
From the ISP Router lets create a single summary route back to all 4 inside networks
ISP#configure terminal
ISP(config)#ip route 172.18.0.0 255.255.128.0 200.18.32.1
ISP(config)#end
ISP#
Lets get all 4 VLAN’s 4 through 7 up and running with the first usable IP address to each respective sub-interface on Router R1 with inside NAT.
R1#configure terminal
R1(config)#interface e0/0.1
R1(config-subif)#descriptions VLAN4
R1(config-subif)#encapsulation dot1q 4
R1(config-subif)#ip address 172.18.0.1 255.255.255.240
R1(config-subif)#ip nat inside
R1(config-subif)#exit
R1(config)#
Ok we have VLAN 4 up and running lets move on to VLAN 5
R1(config)#interface e0/0.2
R1(config-subif)#descriptions VLAN5
R1(config-subif)#encapsulation dot1q 5
R1(config-subif)#ip address 172.18.0.17 255.255.255.240
R1(config-subif)#ip nat inside
R1(config-subif)#exit
R1(config)#
Now that VLAN 4, and 5 are trunking lets continue with VLAN 6
R1(config)#interface e0/0.3
R1(config-subif)#descriptions VLAN6
R1(config-subif)#encapsulation dot1q 4
R1(config-subif)#ip address 172.18.0.33 255.255.255.240
R1(config-subif)#ip nat inside
R1(config-subif)#exit
R1(config)#
Now that VLAN 4, 5, and 6 are up and running lets take care of the last VLAN 7
R1(config)#interface e0/0.4
R1(config-subif)#descriptions VLAN7
R1(config-subif)#encapsulation dot1q 4
R1(config-subif)#ip address 172.18.0.65 255.255.255.240
R1(config-subif)#ip nat inside
R1(config-subif)#end
R1#
Now lets get the outside serial interface configured with the public IP address and NAT
R1#configure terminal
R1(config)#interface s0/0
R1(config-if)#ip address 200.18.32.1 255.255.255.248
R1(config-if)#ip nat outside
R1(config-if)#end
R1#
At this point we can be the process of actually creating the necessary configuration for the NAT Overloading from Router R1’s perspective. Lets start out by creating a simple wildcard ACL for all 4 inside networks.
R1#configure terminal
R1(config)#access-list 1 permit 172.18.0.0 0.0.255.15
R1(config)#end
R1#
Next we can create the ISP Pool and source list for the overloading
R1#configure terminal
R1(config)#ip nat pool ISP 200.18.32.2 200.18.32.2 netmask 255.255.255.248
R1(config)#ip nat inside source list 1 pool ISP overload
R1(config)#end
R1#
Now lets try creating some ICMP traffic by pinging www.cisco.com or 72.163.4.161 from each of the source address on all 4 VLAN’s, but before we do lets clear ALL the NAT translations.
R1#
R1#clear ip nat translations *
R1#
R1#show ip nat translation
R1#
R1#ping 72.163.4.161 so 172.18.0.1

Type escape sequence to abort.
Sending 5, 100-byte ICMP Echos to 72.163.4.161, timeout is 2 seconds:
Packet sent with a source address of 172.18.0.1
!!!!!
Success rate is 100 percent (5/5), round-trip min/avg/max = 28/38/52 ms

R1#ping 72.163.4.161 source 172.18.0.17

Type escape sequence to abort.
Sending 5, 100-byte ICMP Echos to 72.163.4.161, timeout is 2 seconds:
Packet sent with a source address of 172.18.0.17
!!!!!
Success rate is 100 percent (5/5), round-trip min/avg/max = 32/35/48 ms

R1#ping 72.163.4.161 source 172.18.0.33

Type escape sequence to abort.
Sending 5, 100-byte ICMP Echos to 72.163.4.161, timeout is 2 seconds:
Packet sent with a source address of 172.18.0.33
!!!!!
Success rate is 100 percent (5/5), round-trip min/avg/max = 28/36/48 ms

R1#ping 72.163.4.161 source 172.18.0.65

Type escape sequence to abort.
Sending 5, 100-byte ICMP Echos to 72.163.4.161, timeout is 2 seconds:
Packet sent with a source address of 172.18.0.65
!!!!!
Success rate is 100 percent (5/5), round-trip min/avg/max = 32/32/32 ms
R1#
Now lets take a look at some the overloaded translations and statistics
R1#show ip nat translations

Pro Inside global Inside local Outside local Outside global
icmp 200.18.32.2:19 172.18.0.1:19 72.163.4.161:19 72.163.4.161:19
icmp 200.18.32.2:23 172.18.0.17:23 72.163.4.161:23 72.163.4.161:23
icmp 200.18.32.2:24 172.18.0.33:24 72.163.4.161:24 72.165.4.161:24
icmp 200.18.32.2:25 172.18.0.65:25 72.163.4.161:25 72.165.4.161:25
Last but not least lets take a look at the NAT Overloading statistics
R1#show ip nat statistics
Total active translations: 0 (0 static, 0 dynamic; 0 extended)
Outside interfaces:
 Serial0/0
Inside interfaces:
 Ethernet1/0.1, Ethernet1/0.2, Ethernet1/0.3, Ethernet1/0.4
Hits: 62 Misses: 8
Expired translations: 8
Dynamic mappings:
-- Inside Source
[Id: 1] access-list 1 pool ISP refcount 0
 pool ISP: netmask 255.255.255.248
 start 200.18.32.2 end 200.18.32.2
 type generic, total addresses 1, allocated 0 (0%), misses 0
I hope you found this post on NAT Overloading helpful and informative. Be sure to let me know what you think by leaving suggestions, and feedback in the comments section below. You can find out more about these and other articles be checking out recent posts and archives. To learn more about me be sure to check out the About page. And as always thanks again for visiting The Packet.
