
One of the major challenges or hurdles to overcome with any Multihomed BGP configuration is working closely with your Service Provider, and this was no exception. I was working with two MPLS circuits a 500 Meg primary, and a 100 Meg secondary so I needed to make sure that the 500 Meg circuit was always the preferred circuit when operating under normal circumstances, and that the 100 Meg circuit would take over in the event of an upstream problem on the 500 Meg. The key was to make the two N6K’s appear as though they were one Router to my Service Provider. This sounds fairly straight forward and simple, but sometime coordinating changes such as this with your Service Provider can prove to be exhausting..!
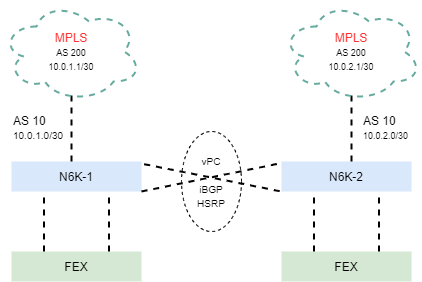
As you can see from the above diagram this going to be done with NX-OS as opposed to IOS. For that matter when it comes to the whole Cisco NEXUS ecosystem this really isn’t the norm. For example I had to actually upgrade the NX-OS just so I could add the BGP feature which we will cover a little later in the configuration.
The VPC Configuration
This is somewhat beyond the scope of this discussion, but its almost impossible to talk about the NEXUS ecosystem without covering Virtual Port Channels. Basically a Virtual Port Channel or VPC allows downstream Nexus 2000 fabric extender (FEX) or Servers that are connected physically two separate Nexus 5000 or 6000 to appear as a single Port Channel. The single biggest advantage being the ability to provide Layer 2 multipathing, which allows for greater redundancy by increasing bandwidth, enabling multiple parallel paths.
Lets jump into building the Virtual Port Channel on N6K-1
N6K-1#configure terminal
N6K-1(config)#int mgmt 0
N6K-1(config-if)#ip address 10.0.0.1/30
N6K-1(config-if)#vrf context management
N6K-1(config-vrf)#ip route 0.0.0.0/0 10.0.0.1
N6K-1(config-vrf)#end
N6K-1#
Now that we have the Virtual Port Channel built on N6K-1 lets get N6K-2 up and running
N6K-2#configure terminal
N6K-2(config)#int mgmt 0
N6K-2(config-if)#ip address 10.0.0.2/30
N6K-2(config-if)#vrf context management
N6K-2(config-vrf)#ip route 0.0.0.0/0 10.0.0.2
N6K-2(config-vrf)#end
N6K-2#
As I outlined in the diagram above VPC, iBGP, and HSRP really make up the 3 main components with regards to High Availability between N6K-1, and N6K-2. Keep in mind that the two N6K’s do not appear as a single logical Switch / Router. They both maintain their independence, but instead share multipath redundancy.
Carrier Considerations
- AS Override
- Default Information route vs Default Route
- Using Communities vs Pre-pending
Configuration HSRP
Lets start off by creating a couple of VLANS on N6K-1, one for Production, and the other for Development. We also need to enable HSRP on both VLAN’s along with a floating gateway address for hosts.
N6K-1#configure terminal
N6K-1(config)#vlan 2
N6K-1(config-if)#name Prod
N6K-1(config-if)#end
N6K-1(config)#vlan 3
N6K-1(config-if)#name Dev
N6K-1(config-if)#exit
N6K-1(config)#
Now lets get VLAN 2 up and running with HSRP
N6K-1(config)#interface vlan 2
N6K-1(config-if)#description Production
N6K-1(config-if)#no shutdown
N6K-1(config-if)#ip address 172.16.0.2/24
N6K-1(config-if-hsrp)#hsrp 10
N6K-1(config-if-hsrp)#preempt delay minimum 5
N6K-1(config-if-hsrp)#ip 172.16.0.1
N6K-1(config-if-hsrp)#exit
N6K-1(config-if)#exit
N6K-1(config)#
Now that VLAN 2 is up and running with HSRP lets move onto VLAN 3
N6K-1(config)#interface vlan 3
N6K-1(config-if)#description Development
N6K-1(config-if)#no shutdown
N6K-1(config-if)#ip address 172.16.1.2/24
N6K-1(config-if-hsrp)#hsrp 10
N6K-1(config-if-hsrp)#preempt delay minimum 5
N6K-1(config-if-hsrp)#ip 172.16.1.1
N6K-1(config-if-hsrp)#exit
N6K-1(config-if)#end
N6K-1#
The BGP Configuration
Lets get started by installing or enabling BGP on NK6-1.
N6K-1#
N6K-1#configure terminal
N6K-1(config)#feature bgp
N6K-1(config)#end
N6K-1#
Consider this for a moment. Your faced with two separate BGP connections on two completely separate Routers, and you need to make sure that one of them is preferred over the other which in my case this would be the 500 Meg MPLS circuit. Turns out there is a vary simple solution to the problem. Since both N6K-1, and N6K-2 will share an iBGP session between the two of them we can simply make N6K-1 routes appear more desirable by simply setting the BGP attribute from N6K-1 routes to a higher Local Preference such as 200. Another vary important BGP Attribute between N6K-1, and N6K-2 iBGP session was the use of Next Hop Self.
N6K-1#
N6K-1#configure terminal
N6K-1(config)#route-map LOCAL-PREF
N6K-1(config-route-map)#set local-preference 200
N6K-1(config-route-map)#end
N6K-1#
Now lets get started on the overall BGP configuration on N6K-1. Remember that N6K-1 will be the Router with the 500 Meg MPLS circuite. Notice the reference to the Route Map created above to set the BGP attribute Local Preference to 200 when advertising routes between N6K-1, and N6K-2.
N6K-1#configure termianl
N6K-1(config)#router bgp 10
N6K-1(config-router)#router-id 10.0.0.2
N6K-1(config-router)#log-neighbor-changes
N6K-1(config-router)#address-family ipv4 unicast
N6K-1(config-router-af)#network 172.17.0.0/24
N6K-1(config-router-af)#network 172.17.1.0/24
N6K-1(config-router-af)#exit
N6K-1(config-router)#neighbor 10.0.1.1 remote-as 200
N6K-1(config-router-neighbor)#
N6K-1(config-router-neighbor)#address-family ipv4 unicast
N6K-1(config-router-neighbor-af)#
N6K-1(config-router-neighbor-af)#default-originate
N6K-1(config-router-neighbor-af)#soft-reconfiguration inbound
N6K-1(config-router-neighbor-af)#exit
N6K-1(config-router-neighbor)#exit
N6K-1(config-router)#
N6K-1(config-router)#neighbor 172.17.0.3 remote-as 10
N6K-1(config-router-neighbor)#address-family ipv4 unicast
N6K-1(config-router-neighbor-af)#
N6K-1(config-router-neighbor-af)#route-map LOCAL-PREF out
N6K-1(config-router-neighbor-af)#next-hop-self
N6K-1(config-router-neighbor-af)#soft-reconfiguration inbound
N6K-1(config-router-neighbor-af)#end
N6K-1#
The next challenge was to make sure the 100 Meg MPLS circuit was less desirable upstream on the Service Providers PE Router. Once again the solution turned out to be vary simple. I just needed to pre-pend the AS several times for the prefixes that I was advertising upstream to my Service Providers MPLS PE Router.
N6K-2#
N6K-2#configure terminal
N6K-2(config)#feature bgp
N6K-2(config#end
N6K-2#
Lets get HSRP up and running on N6K-2 for the Production, and Development VLAN’s. Remember that N6K-1 is the VTP Server for the Layer 2 domain so there is no need to create the actual Layer 2 VLAN’s on N6K-2.
N6K-2(config)#interface vlan 2
N6K-2(config-if)#ip address 172.16.0.3/24
N6K-2(config-if-hsrp)#hsrp 10
N6K-2(config-if-hsrp)#preempt delay minimum 5
N6K-2(config-if-hsrp)#ip 172.16.0.1
N6K-2(config-if-hsrp)#exit
N6K-2(config-if)#exit
N6K-2(config)#
Now lets get HSRP up and running for VLAN 3 on N6K-2
N6K-2(config)#interface vlan 3
N6K-2(config-if)#ip address 172.16.1.3/24
N6K-2(config-if-hsrp)#hsrp 10
N6K-2(config-if-hsrp)#preempt delay minimum 5
N6K-2(config-if-hsrp)#ip 172.16.1.1
N6K-2(config-if-hsrp)#exit
N6K-2(config-if)#end
N6K-2#
Now lets create the Route Map to be used between N6K-2, and the Service Provider
N6K-2#
N6K-2#configure terminal
N6K-2(config)#route-map PREPEND permit 10
N6K-2(config-route-map)#set as-path prepend 10 10 10
N6K-2(config-route-map)#end
N6K-2#
Moving on to the BGP configuration between N6K-2, N6K-1, and the Service Provider PE.
N6K-2#configure terminal
N6K-2(config)#router bgp 10
N6K-2(config-router)#router-id 10.0.2.2
N6K-2(config-router)#log-neighbor-changes
N6K-2(config-router)#address-family ipv4 unicast
N6K-2(config-router-af)#network 172.17.0.0/24
N6K-2(config-router-af)#network 172.17.1.0/24
N6K-2(config-router-af)#exit
N6K-2(config-router)#neighbor 10.0.2.1 remote-as 200
N6K-2(config-router-neighbor)#address-family ipv4 unicast
N6K-2(config-router-neighbor-af)#
N6K-2(config-router-neighbor-af)#route-map PREPEND out
N6K-2(config-router-neighbor-af)#default-originate route-map PREPEND
N6K-2(config-router-neighbor-af)#exit
N6K-2(config-router-neighbor)#exit
N6K-2(config-router)#neighbor 172.17.100.2 remote-as 10
N6K-2(config-router-neighbor)#address-family ipv4 unicast
N6K-2(config-router-neighbor-af)#soft-reconfiguration inbound
N6K-2(config-router-neighbor-af)#next-hop-self
N6K-2(config-router-neighbor-af)#end
N6K-2#
Checking The Routes
N6K-2#show ip bgp | begin Network

Network              Next Hop        Metric     LocPrf     Weight   Path
* e0.0.0.0/0         67.133.89.161                            0     200 200 i
*>i 172.17.0.2                                   200          0     200 200 i
*>i10.4.6.0/24       172.17.0.2                  200          0     200 65006 i
* e 67.133.89.161                                             0     200 65006 i
* e10.4.8.0/24       67.133.89.161                            0     200 65008 i
*>i 172.17.0.2                                   200          0     200 65008 i
* e10.4.9.0/24       67.133.89.161                            0     200 64710 i
*>i 172.17.100.2                                 200          0     200 64710 i
*>i10.4.10.0/24      172.17.0.2                  200          0     200 65010 i
* e 67.133.89.161                                             0     200 65010 i
*>i10.4.16.0/24      172.17.0.2                  200          0     200 65016 i
* e 67.133.89.161                                             0     200 65016 i
* e10.4.18.0/24      67.133.89.161                            0     200 65018 i
Another simple, but powerful way to compare which N6K is the preferred MPLS Router is by simply checking the transmit and receive interface statistics on each receptive N6K’s routed WAN interfaces. In my case this is Interface Ethernet1/21 on both N6K’s.
N6K-1# show interface e1/21 | begin RX
 RX
      384296 unicast packets 0 multicast packets 2 broadcast packets
      39498 input packets 3009972 bytes
      0 jumbo packets 0 storm suppression bytes
      0 runts 0 giants 0 CRC 0 no buffer
      0 input error 0 short frame 0 overrun 0 underrun 0 ignored
      0 watchdog 0 bad etype drop 0 bad proto drop 0 if down drop
      0 input with dribble 0 input discard
      0 Rx pause
 TX
     288690 unicast packets 10716 multicast packets 172 broadcast packets
     29778 output packets 4944905 bytes
     0 jumbo packets
     0 output error 0 collision 0 deferred 0 late collision
     0 lost carrier 0 no carrier 0 babble 0 output discard
     0 Tx pause
Now lets check N6K-2 Ethernet1/21 routed WAN interface statistics
N6K-2# show interface e1/21 | begin RX
 RX
     1496 unicast packets 0 multicast packets 2 broadcast packets
     1498 input packets 1972 bytes
     0 jumbo packets 0 storm suppression bytes
     0 runts 0 giants 0 CRC 0 no buffer
     0 input error 0 short frame 0 overrun 0 underrun 0 ignored
     0 watchdog 0 bad etype drop 0 bad proto drop 0 if down drop
     0 input with dribble 0 input discard
     0 Rx pause
 TX
     1290 unicast packets 10716 multicast packets 1172 broadcast packets
     2778 output packets 1905 bytes
     0 jumbo packets
     0 output error 0 collision 0 deferred 0 late collision
     0 lost carrier 0 no carrier 0 babble 0 output discard
     0 Tx pause
Keep in mind that N6K-2 needs to exchanging eBGP information, messages and routes with it’s upstream neighbor so your going to see some RX, and TX packet statistics on the interface. In the event of a failure on the Primary MPLS circuit you should verify the that the advertised routes contain the pre pended AS. Lets take a look at the routing table on a remote router lets say B13RTR when N6K-2 has become the primary MPLS Router due to some unforeseen network outage.
 RTR#show ip bgp neighbor 12.159.19.12 routes | include 172.17.0.0
*> 172.17.0.0/24 12.159.19.12 0 200 10 10 10 i
Notice the advertised route from the PE router 12.159.19.12 for the prefix 172.17.0.0 with the pre pended AS in the above output. This a direct result of the PREPEND Route Map that was created earlier in the configuration.
I hope you found this post helpful and informative. Be sure to let me know what you think by leaving your suggestions, and feedback in the comments section below. You can find out more about these and other articles be checking out recent posts and archives. To learn more about myself be sure to check out the About page. And as always thanks again for visiting The Packet.