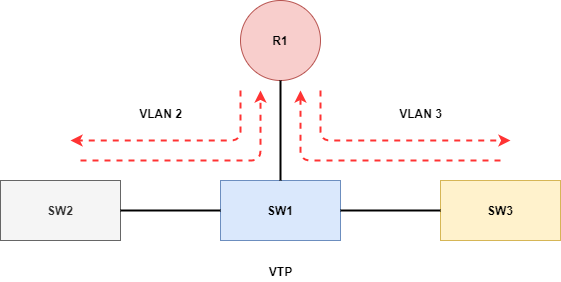
Multilayer Switching or MLS refers to the process by which a LAN Switch, which operates at Layers 2, and 3 also uses logic and protocols from layers other than Layer 2 to forward Frames or in this case Packets. The Term Layer 3 switching refers specifically to the use of Layer 3 destination address similar to those used when making forwarding decisions. The latest Switch hardware and software from Cisco uses CEF switching to optimize the forwarding of Packets.
Key components
- Routed Port
- Switched Virtual Interface or SVI
- CEF
- ASIC’s
Router On A Stick
Before the advent of Multilayer Switching the typical way to route packets between network segments was over a trunk port via the Router. There had to be some type of Layer 3 Routing Engine involved in order to accomplish the task. This method of routing was not nearly as efficient as MLS not to mention all the unnecessary traffic that has to traverse the trunked port up the Router and then back down. This is where Multilayer Switching or MLS really comes into play.

There are certain circumstances where Trunking up to the Router is a requirement or a necessity. Such as a remote office locations that needs to preserve or match on QoS markings across a WAN link for time sensitive applications such as VoIP or when the Switch platform simply doesn’t support Layer 3 Switching.
Lets set the speed and duplex on the physical interface
R1#
R1#configure terminal
R1(config)#interface gi0/0
R1(config-if)#speed 100
R1(config-if)#duplex full
R1(config-if)#exit
R1(config)#exit
R1#
Create the subinterface for VLAN 2 and configure the encapsulation
R1#configure terminal
R1(config)#interface gi0/0.1
R1(config-subif)#
R1(config-subif)#description Trunk to Switch
R1(config-subif)#encapsulation dot1Q 2
R1(config-subif)#ip address 172.18.0.1 255.255.255.0
R1(config-subif)#exit
R1(config)#exit
R1#
Create the subinterface for VLAN 3 and configure the encapsulation
R1#configure terminal
R1(config)#interface gi0/0.2
R1(config-subif)#description Trunk to Switch
R1(config-subif)#encapsulation dot1Q 3
R1(config-subif)#ip address 172.18.1.1 255.255.255.0
R1(config-subif)#exit
R1(config)#exit
R1#
Set the speed and duplex on the Switch so it matches the Router
SW1#configure terminal
SW1(config)#interface gi1/0/0
SW1(config-if)#description Trunk to Router
SW1(config-if)#speed 100
SW1(config-if)#duplex full
SW1(config-if)#exit
SW1(config)#exit
SW1#
On the Switch configure VTP Server and define the VTP domain
SW1#configure terminal
SW1(config)#vtp mode server
SW1(config)#vtp domain ABC
SW1(config)#exit
SW1#
Configure the VLAN interface for VLAN 2 and set the name
SW1#configure terminal
SW1(config)#interface vlan 2
SW1(config-if)#name Prod
SW1(config-if)#exit
SW1(config)exit
SW1#
Configure the VLAN interface for VLAN 3 and set the name
SW1#confiure termianl
SW1(config)#interface vlan 3
SW1(config-if)#name Dev
SW1(config-if)#exit
SW1(config)exit
SW1#
Add the range of interfaces to the broadcast domain VLAN 2
SW1#configure terminal
SW1(config)#interface range gi1/0/1 - 12
SW1(config-if-range)#switchport
SW1(config-if-range)#switchport access vlan 2
SW1(config-if-range)#no shutdown
SW1(config-if-range)#exit
SW1(config)#exit
SW1#
Add the range of interfaces to the broadcast domain VLAN 3
SW1#configure terminal
SW1(config)#interface range gi1/0/13 - 24
SW1(config-if-range)#switchport
SW1(config-if-range)#switchport access vlan 3
SW1(config-if-range)#no shutdown
SW1(config-if-range)#exit
SW1(config)#exit
SW1#

The real key to Multilayer Switching is the utilization of Cisco Express Forwarding or CEF at the Switching level. In short the ability to take advantage of the Hardware ASIC’s and keep routed traffic away from the Layer 3 routing engine. To do this requires a couple key components. First and foremost is a Layer 3 capable Switch, and the other is Cisco Express Forward or CEF. This of course doesn’t mean that tagging or trunking from the Switch to Router is no longer necessary in fact is as important as ever. For example in the case of voice / 802.1p the need to maintain DSCP tagging values from the Switch to Router still remains vary important.
Lets enable Cisco Express Forwarding on the Switch
SW1#configure terminal
SW1(config)#ip routing
SW(config)#exit
SW1#
Configure a layer 3 routed port for VLAN 2
SW1#configure terminal
SW1(config)#interface gi0/1
SW1(config-if)#no switchport
SW1(config-if)#ip address 172.18.0.2 255.255.255.0
SW1(config-if)#no shutdown
SW1(config-if)#exit
SW1(config)#exit
SW1#
Configure a layer 3 Switched Virtual Interface or SVI for VLAN 2
SW1#configure terminal
SW1(config)#interface vlan 2
SW1(config-if)#description SVI for VLAN 2
SW1(config-if)#ip address 192.168.0.1 255.255.255.0
SW1(config-if)#no shutdown
SW1(config-if)#exit
SW1(config)#exit
SW1#
Configure a layer 3 Switched Virtual Interface or SVI for VLAN 3
SW1#configure terminal
SW1(config-if)#interface vlan 3
SW1(config-if)#description SVI for VLAN 3
SW1(config-if)#ip address 192.168.1.1 255.255.255.0
SW1(config-if)#no shutdown
SW1(config-if)#exit
SW1(config)#exit
SW1#
Believe it or not its really that simple in most cases. This is a simple example, but the idea remains the same. By simply configuring the correct interfaces, and enabling Cisco Express Forwarding we have eliminated a lot of unnecessary traffic and burden on the Router, and more importantly the Network is running faster.
