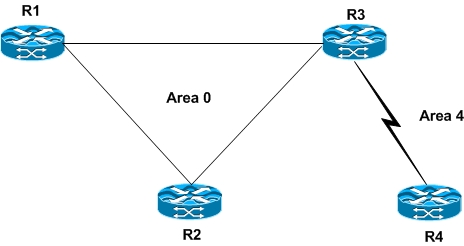
The OSPF protocol is based on link-state technology, which is a departure from the Bellman-Ford vector based algorithms used in traditional Internet routing protocols such as RIP. OSPF has introduced new concepts such as authentication of routing updates, Variable Length Subnet Masks or VLSM route summarization, and so forth.
The Backbone Area or Area 0
In most cases 0 has little or no value, but in the world of OSPF its the most important value. The OSPF protocol has special restrictions when multiple areas are involved. If more than one area is configured, one of these areas has to be area 0. This special area often referred to as the backbone area is required for OSPF operation. When designing networks it is good practice to start with area 0 and then expand into other areas later on.
The Router ID or RID
- Use the Router ID (RID) configured under OSPF
- Use the highest numerical IP on any Interface
- Use the highest numerical IP on any Loopback Interface
The Priority
The OSPF priority helps determine the DR and BDR on the network to which this interface is connected. Priority is an 8-bit field based on which DRs and BDRs are elected. The router with the highest priority becomes the DR. If the priorities are the same, the router with the highest router ID becomes the DR.
- Router: neighbor x.x.x.x priority x – The default is 0
- Interface: ip ospf priority x
The Cost
The cost (also called metric) of an interface in OSPF is an indication of the overhead required to send packets across a certain interface. The cost of an interface is inversely proportional to the bandwidth of that interface. ip ospf cost #. The default reference bandwidth to 100 or 100 Mbps.
The DR and BDR Election
DR and BDR election is done via the Hello messages. Hello packets are exchanged via Link-local multicast packets using 224.0.0.5, and 224.0.0.6 on each area segment. The Router with the highest OSPF priority on a segment will become the DR for that segment. The same process is repeated for the BDR. In case of a tie, the router with the highest RID will win. The default for the interface OSPF priority is one. Remember that the DR and BDR concepts are per multiaccess segment.

Lets get started by configuring Router R1 for Area 0
R1#config t
R1(config)#router ospf 1
R1(config-router)#router-id 100.100.100.100
R1(config-router)#log-adjacency-changes
R1(config-router)#network 10.0.0.0 0.0.0.3 area 0
R1(config-router)#network 10.1.1.0 0.0.0.3 area 0
R1(config-router)#network 172.0.0.0 0.0.0.255 area 0
R1(config-router)#exit
R1(config)#exit
R1#
Something that’s often overlooked or misunderstood with regards to advertising prefixes with OSPF or EIGRP is that after the network or prefix have been advertised under the global router configuration the Router will actually begins running the protocol or processes on the interface itself.
R1#show ip ospf interface brief
Interface     PID   Area        IP Address/Mask  Cost State Nbrs F/C
Et0/1         1     0           10.1.1.1/30      10   DR    1/1
Et0/0         1     0           10.0.0.1/30      10   DR    1/1
Lets take a quick look at the default Hello and Dead interval timers on R1
R1#show ip ospf interface | include Hello
 Timer intervals configured, Hello 10, Dead 40, Wait 40, Retransmit 5
  Hello due in 00:00:03
Lets configure Router R2 for Area 0
R2#config t
R2(config)#router ospf 1
R2(config-router)#router-id 10.0.0.2
R2(config-router)#log-adjacency-changes
R2(config-router)#network 10.0.0.0 0.0.0.3 area 0
R2(config-router)#network 172.0.2.0 0.0.0.255 area 0
R2(config-router)#exit
R2(config)#exit
R2#
R2#show ip ospf interface brief
Interface     PID   Area        IP Address/Mask  Cost State Nbrs F/C
Lo0           1     0           172.0.2.1/24     10   LOOP  1/1
Et0/0         1     0           10.0.0.2/30      10   BDR   1/1
Lets configure Router R3 for Area 0, and Area 4
R3#config t
R3(config)#router ospf 1
R3(config-router)#router-id 3.3.3.3
R3(config-router)#log-adjacency-changes
R3(config-router)#redistribute connected
R3(config-router)#network 10.1.1.0 0.0.0.3 area 0
R3(config-router)#network 10.4.4.0 0.0.0.3 area 4
R3(config-router)#network 172.0.3.0 0.0.0.255 area 0
R3(config-rotuer)#network 172.0.3.0 0.0.0.255 area 4
R3(config-rotuer)#exit
R3(config)#exit
R3#
R3#show ip ospf interface brief
Interface    PID   Area         IP Address/Mask  Cost State Nbrs F/C
Et0/0        1     0            10.1.1.2/30      10   BDR   1/1
Lo0          1     4            172.0.3.1/24     1    LOOP  0/0
Se1/0        1     4            10.4.4.1/30      64   P2P   1/1
Lets configure router R4 for Area 4
R4#config t
R4(config)#router ospf 1
R4(config-router)#router-id 4.4.4.4
R4(config-router)#log-adjacency-changes
R4(config-router)#network 10.4.4.0 0.0.0.3 area 4
R4(config-router)#network 172.0.4.0 0.0.0.255 area 4
R4(config-router)#exit
R4(config)#exit
R4#
R1#show ip route ospf
172.0.0.0/32 is subnetted, 3 subnets
O IA 172.0.4.1 [110/75] via 10.1.1.2, 00:00:14, Ethernet0/1
O IA 172.0.3.1 [110/11] via 10.1.1.2, 00:00:14, Ethernet0/1
O 172.0.2.1 [110/11] via 10.0.0.2, 00:00:14, Ethernet0/0
10.0.0.0/30 is subnetted, 3 subnets
O IA 10.4.4.0 [110/74] via 10.1.1.2, 00:00:14, Ethernet0/1
R3#show ip ospf neighbor

Neighbor ID      Pri   State     Dead Time  Address   Interface
100.100.100.100    1   FULL/DR   00:00:35   10.1.1.1  Ethernet0/0
4.4.4.4 0 FULL/ -  0             00:00:35   10.4.4.2  Serial1/0
R4#show ip ospf neighbor
Neighbor ID     Pri    State    Dead Time   Address   Interface
3.3.3.3           0    FULL/ -  00:00:35    10.4.4.1  Serial0/0
I hope you found this post on OSPF Area 0 helpful and informative. Be sure to let me know what you think by leaving suggestions, and feedback in the comments section below. You can find out more about these and other articles be checking out recent posts and archives. To learn more about me be sure to check out the About page. And as always thanks again for visiting The Packet.
