If your planning on running voice or you already have voice running on your network, and you have a Wireless infrastructure in place there are some important consideration to keep in mind. The following list of considerations are ones I try to implement when I’m rolling out voice over a Wireless Network.
Wireless LAN Controller Interface
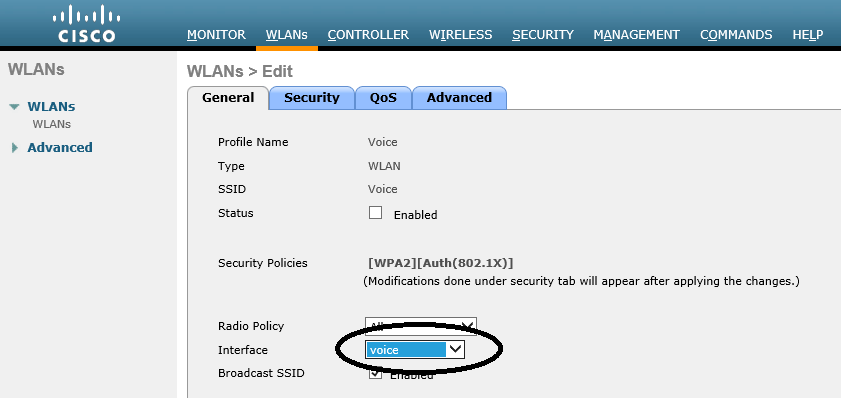
One of the most important items on the list of things to do is the creation or configuration of the Voice Interface on the Wireless LAN Controller. With Cisco Wireless WLC’s you have the ability to define multiple Interface that can be used for various applications such as Voice or Guest related traffic.
From here you can define the voice interface as well as the 802.1q VLAN tag that the voice related traffic is associated with. The voice interface will be used along with the WLAN that gets created for your voice related traffic.This is the real key to carrying the VLAN tag from the Switch to the WLC, and across the X.509 tunnel to the AP.
QoS
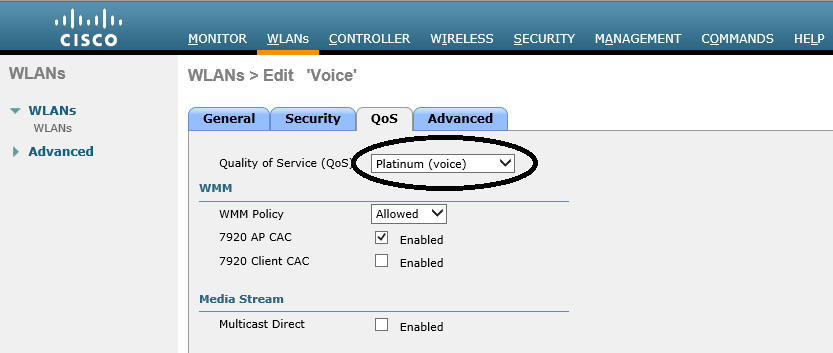
A vary nice feature of Cisco Wireless LAN Controllers are the out of the box predefined QoS levels. This may vary depending on the version of code you are running on your Wireless LAN Controller. Most version come with following levels of QoS. I always select the Platinum option on my Voice WLAN when configuring QoS, but you could certainly use the Gold QoS options as well. The important thing is that you configure one or the other..!
- Bronze – Background
- Gold – Voice
- Platinum – Voice
- Silver – Best effort

WLAN
One of the most important pieces when creating the WLAN for Voice along with the correct QoS policy is the selection of the correct Voice interface. This vary important due to the fact the Cisco Phone has set the 802.1p Layer 2 Header information and we need to carry all the way through to the WLAN with the correct interface queuing.

Trunking
Voice and or Guest related traffic usually dictates the need to carry Layer 2 tagging from the Switch to the WLC. This is a simply example of the Trunk configuration between the Switch and the Wireless Controller. In this example DTP is disabled, MLS QoS is enabled for the 802.1p Header.
Switch#configure terminal
Switch(config)#interface GigabitEthernet1/0/4
Switch(config-if)#description Trunk to WLC
Switch(config-if)#switchport mode trunk
Switch(config-if)#switchport nonegotiate
Switch(config-if)#mls qos trust dscp
Switch(config-if)#end
Switch#
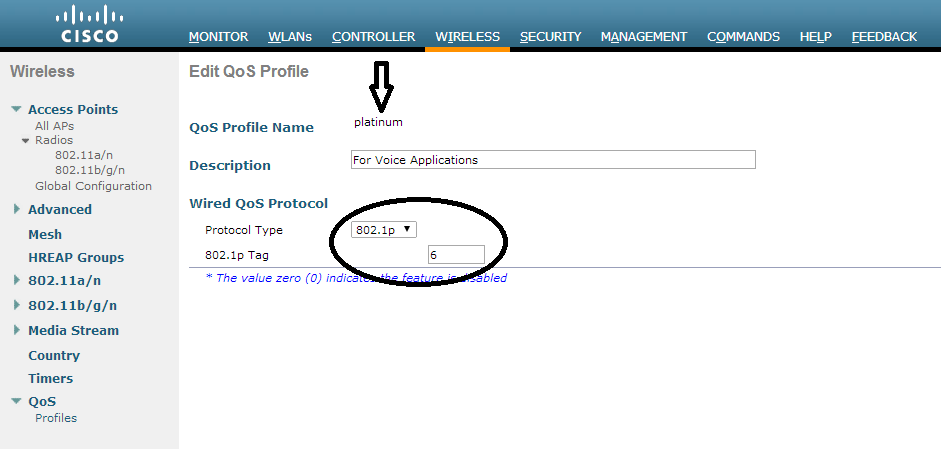
Now that were carrying the 802.1p Layer 2 Header across the Trunk on the Switch to the WLC we need to make sure that 802.11p. So if you are providing Guest access over your Wireless Network you should also configure the Layer 2 802.1p to 802.11p Header QoS classification.
The Avaliable 802.11p Values
- Bronze – Background = 1
- Gold – Voice = 5
- Platinum – Voice = 6
- Silver – Best effort = 3
In order to enable the 802.11p tagging on the WLC you will need to disable the 802.11a, as well as the 802.11b Radios temporarily. This can be accomplished by selecting the 802.11a and 802.11b Networks.

The Radio
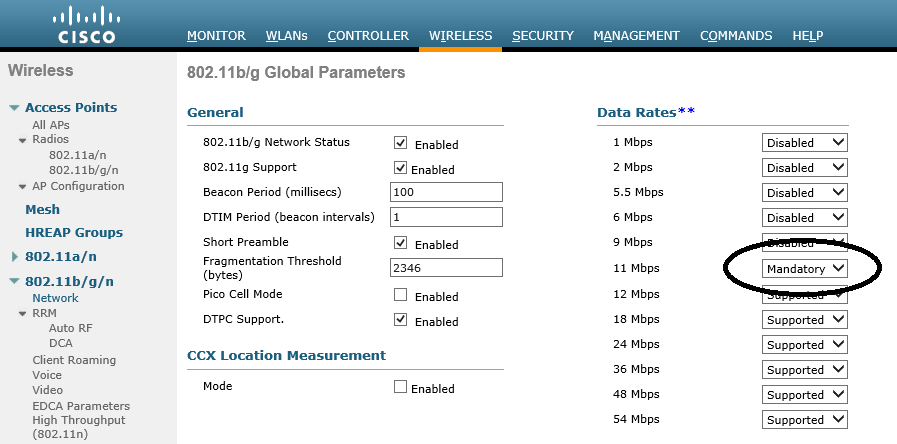
Last but certainly not least are the considerations around the Data Rates and which ones should be disabled and which rates should be supported. Remember when their are one or more devices sharing the same AP the slowest negotiated speed always wins. It’s also a good idea to double check older legacy devices that require channels such as 802.11b.

The above is good practice for most wireless environments even if your not running voice over the air. Most of data rate channels are not needed and can cause poor performance. Notice that the data rates from 1 Mbps – 5.5 Mbps are set to disabled while the 11 Mbps is set to mandatory, and the remaining are set to supported.
I hope you found this post on 802.11 QoS helpful and informative. Be sure to let me know what you think by leaving suggestions, and feedback in the comments section below. You can find out more about these and other articles be checking out recent posts and archives. To learn more about me be sure to check out the About page. And as always thanks again for visiting The Packet.
