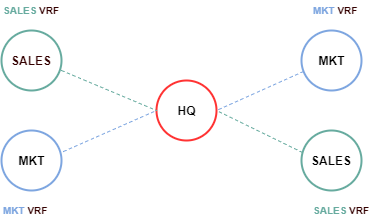
Virtual Route Forwarding or VRF’s is vitalization feature much like those used with VLAN’s. As a VLAN takes care of logical segmentation or isolation at Layer 2 VRF’s allow for logical segmentation at Layer 3. This becomes increasingly important when implementing such technologies as Multi-Protocol Label Switching or MPLS. When VRF’s are implemented or utilized outside of MPLS this is often referred to as VRF Lite. In this example I’m using only the IPv4 address family. If were using both IPv4 and IPv6 together or separately I could us the VRF definition form of the command.
IPv4 VRF Address Family
- ip vrf [ name ]
- ip vrf forwarding [ name ]
IPv4 & IPv6 VRF Address Families
- vrf definition [ name ]
- vrf forwarding [ name ]

Sales
- R1-SALES WAN Point To Point 10.0.1.0/30
- R2-SALES WAN Point To Point 10.0.1.4/30
- Network 192.168.1.0/24
- Network 192.168.2.0/24
Marketing
- R1-MKT WAN Point To Point 10.0.1.0/30
- R2-MKT WAN Point To Point 10.0.1.4/30
- Network 192.168.1.0/24
- Network 192.168.2.0/24
Notice above that the Sales network, and the Marketing network share the exact the same Point To Point IP addresses, and Networks. This is real magic behind VRF’s the ability to create a completely separate virtual routing table outside of the global routing table hence the description Virtual Routing and Forwarding. So lets get started by bring up all the interfaces and configuring OSPF between all the Routers.
R1-SALES#
R1-SALES#configure terminal
R1-SALES(config)#interface Loopback0
R1-SALES(config-if)#ip address 192.168.1.1 255.255.255.0
R1-SALES(config-if)#interface s0/0
R1-SALES(config-if)#no shutdown
R1-SALES(config-if)#ip address 10.0.1.2 255.255.255.0
R1-SALES(config-if)#end
R1-SALES#
Now lets get OSPF up and running on Router R1-SALES for area 0
R1-SALES#
R1-SALES#configure terminal
R1-SALES(config)#router ospf 1
R1-SALES(config-router)#router-id 10.0.1.2
R1-SALES(config-router)#network 10.0.1.0 0.0.0.3 area 0
R1-SALES(config-router)#network 192.168.1.0 0.0.0.255 area 0
R1-SALES(config-router)#end
R1-SALES#
Now lets get started with the interfaces on Router R2-SALES
R2-SALES#
R2-SALES#configure terminal
R2-SALES(config)#interface Loopback0
R2-SALES(config-if)#ip address 192.168.2.1 255.255.255.0
R2-SALES(config-if)#interface s0/0
R2-SALES(config-if)#no shutdown
R2-SALES(config-if)#ip address 10.0.1.6 255.255.255.0
R2-SALES(config-if)#end
R2-SALES#
Now lets get OSPF up and running on Router R2-SALES for area 0
R2-SALES#
R2-SALES#configure terminal
R2-SALES(config)#router ospf 1
R2-SALES(config-router)#router-id 10.0.1.6
R2-SALES(config-router)#network 10.0.1.0 0.0.0.3 area 0
R2-SALES(config-router)#network 192.168.2.0 0.0.0.255 area 0
R2-SALES(config-router)#end
R2-SALES#
Lets define the VRF’s for Sales and Marketing on the HQ Router.
HQ#configure terminal
HQ(config)#ip vrf SALES
HQ(config-vrf)#end
HQ(config)#ip vrf MKT
HQ(config-vrf)#exit
HQ(config)#
Lets associate the VRF’s that we defined above on HQ interfaces.
HQ(config)#interface Serial0/0
HQ(config-if)#ip vrf forwarding SALES
HQ(config-if)#ip address 10.0.1.1 255.255.255.252
HQ(config-if)#interface Serial0/3
HQ(config-if)#ip vrf forwarding SALES
HQ(config-if)#ip address 10.0.1.5 255.255.255.252
HQ(config-if)#interface Serial0/1
HQ(config-if)#ip vrf forwarding MKT
HQ(config-if)#ip address 10.0.1.5 255.255.255.252
HQ(config-if)#interface Serial0/2
HQ(config-if)#ip vrf forwarding MKT
HQ(config-if)#ip address 10.0.1.1 255.255.255.252
HQ(config-if)#exit
HQ(config)#
At this point we are ready to configure OSPF for each respective VRF on the HQ Router.
HQ#configure terminal
HQ(config)#router ospf 1 vrf SALES
HQ(config-router)#router-id 1.1.1.1
HQ(config-router)#log-adjacency-changes
HQ(config-router)#network 10.0.1.0 0.0.0.3 area 0
HQ(config-router)#network 10.0.1.4 0.0.0.3 area 0
HQ(config-router)#exit
HQ(config)#
HQ(config)#router ospf 2 vrf MKT
HQ(config-router)#router-id 2.2.2.2
HQ(config-router)#log-adjacency-changes
HQ(config-router)#network 10.0.1.0 0.0.0.3 area 0
HQ(config-router)#network 10.0.1.4 0.0.0.3 area 0
HQ(config-router)#end
HQ#
Now lets get started with the interfaces on the two Marketing Routers.
R1-MKT#configure terminal
R1-MKT(config)#interface Loopback0
R1-MKT(config-if)#ip address 192.168.2.1 255.255.255.0
R1-MKT(config-if)#interface s0/0
R1-MKT(config-if)#no shutdown
R1-MKT(config-if)#ip address 10.0.1.6 255.255.255.0
R1-MKT(config-if)#end
R1-MKT#
Now lets get OSPF up and running on Router R1-MKT for area 0
R1-MKT#
R1-MKT#configure terminal
R1-MKT(config)#router ospf 1
R1-MKT(config-router)#router-id 10.0.1.2
R1-MKT(config-router)#network 10.0.1.4 0.0.0.3 area 0
R1-MKT(config-router)#network 192.168.1.0 0.0.0.255 area 0
R1-MKT(config-router)#end
R1-MKT#
Now lets get started on Router R2-MKT.
R2-MKT#
R2-MKT#configure terminal
R2-MKT(config)#interface Loopback0
R2-MKT(config-if)#ip address 192.168.2.0 255.255.255.0
R2-MKT(config-if)#interface s0/0
R2-MKT(config-if)#no shutdown
R2-MKT(config-if)#ip address 10.0.1.6 255.255.255.0
R2-MKT(config-if)#end
R2-MKT#
Now lets get OSPF up and running on Router R2-MKT for area 0
R2-MKT#
R2-MKT#configure terminal
R2-MKT(config)#router ospf 1
R2-MKT(config-router)#router-id 10.0.1.6
R2-MKT(config-router)#network 10.0.1.4 0.0.0.3 area 0
R2-MKT(config-router)#network 192.168.2.0 0.0.0.255 area 0
R2-MKT(config-router)#end
R2-MKT#
Now lets take a look at the VRF routing table for SALES on the HQ Router.
HQ#show ip route vrf SALES

Gateway of last resort is not set

10.0.0.0/30 is subnetted, 2 subnets
C 10.0.1.0 is directly connected, Serial0/0
C 10.0.1.4 is directly connected, Serial0/3
 192.168.1.0/32 is subnetted, 1 subnets
O 192.168.1.1 [110/65] via 10.0.1.2, 00:49:40, Serial0/0
 192.168.2.0/32 is subnetted, 1 subnets
O 192.168.2.1 [110/65] via 10.0.1.6, 00:49:40, Serial0/3
Lets take a look the VRF Routing for Marketing on the HQ Router.
CORE#show ip route vrf MKT

Gateway of last reset is not set

10.0.0.0/30 is subnetted, 2 subnets
C 10.0.1.0 is directly connected, Serial0/2
C 10.0.1.4 is directly connected, Serial0/1
 192.168.1.0/32 is subnetted, 1 subnets
O 192.168.1.1 [110/65] via 10.0.1.2, 00:54:45, Serial0/2
 192.168.2.0/32 is subnetted, 1 subnets
O 192.168.2.1 [110/65] via 10.0.1.6, 00:54:45, Serial0/1
If your interested in seeing more information regarding the use of VRF’s you can check out my MPLS post. It covers a complete MPLS network configuration from start to finish while utilizing VRF’s throughout the configuration.
I hope you found this post on VRF Light helpful and informative. Be sure to let me know what you think by leaving suggestions, and feedback in the comments section below. You can find out more about these and other articles be checking out recent posts and archives. To learn more about me be sure to check out the About page. And as always thanks again for visiting The Packet.
