I’ve had the opportunity of deploying, supporting, and upgrading both StackWise, and FlexStack Switches. Both platforms offer exceptional performance and reliability. Personally I wouldn’t recommend either platform for the Datacenter, however the 3750 with it’s higher stack ring performance, Stack Power, and Layer 3 capabilities isn’t a bad option. This also requires careful planning of redundant EtherChannel paths, and Trunking between Stack and the Router, but that’s beyond the scope of this discussion.
The ability to stack a set of Cisco Switch’s together is commonly refereed to as StackWise or FlexStack depending on the switch platform. Cisco Catalyst 3750 Switches connect via StackWise modules and cables. Both the 2960S, and 2960X require a FlexStack module, however the 3750 platform inherently has it built in. Both require either StackWise or FlexStack depending on the platform in order to interconnect the fabric between the modules. The modules and cables are not interchangeable between the platforms and they have varying performances standards and capabilities.

Available Stack Platforms
- StackWise – 3750 Platform
- FlexStack – 2960S & 2960X Platforms
Stack Master Election
- The Switch the highest stack member priority

- A Switch with the higher Software / Hardware priority
- The Switch with the longest up time
- The Switch with the lowest MAC address
Performance & Benefits
- Resilience
- StackWise bidirectional 32Gig
- FlexStack 2960s bidirectional 10Gig
- FlexStack 2960x bidirectional 20Gig
- Online insertion and removal
- IOS version control – Master Switch
- Single Logical Management
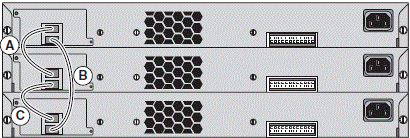
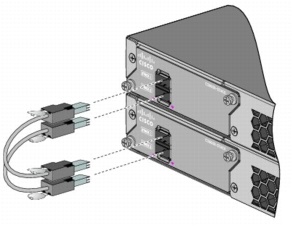
For example lets connect the following three switches SW1, SW2, and SW3 together via FlexStack. We can assume the three switches are either 2960S or 2960X switches due to the fact that we’re connecting via FlexStack. The key with regards to the cabling depends on the number of switches in the Stack. For example if there were a total of two switches the in the stack it would only require 2 FlexStack stack cables in order to complete the ring fabric. If you we’re working with 3 switches the stack would require a total of 3 FlexStack cables in order to complete the ring fabric.
Much the same way that Spanning-Tree uses the chassis Base MAC to assist with the Bridge Priority election StackWise, and FlexStack use the Base MAC address to assist with the Switch Priority. Lets take a look at the Base MAC from switches SW1, SW2, and SW3 before we connect all three together and make Switch SW1 the Master Switch in the stack.
SW1#show version | include Base
Base ethernet MAC Address : F0:B9:EA:D5:9D:2B
SW1#
Looking at the Base MAC on Switch SW2 before connecting it via the FlexStack cables.
SW2#show version | include Base
Base ethernet MAC Address : F0:B9:1A:94:CC:1B
SW2#
Looking at the Base MAC on Switch SW3 before connecting it via the FlexStack cables.
SW3show version | include Base
Base ethernet MAC Address : F0:22:12:69:D4:80
SW3#
Now that we’ve taken the time to gather all the Base MAC addresses lets take a look at the current state of the stack after the election to see which switch was elected as the Stack Master. So based on the fact that all three switches have the same stack priority of 1 we can see the switch SW3 with it’s base MAC address of f022.1269.d480 has won the election to become the Stack Master.
SW1#show switch
Switch/Stack Mac Address : f022.7269.d480
                                          H/W Current
Switch#  Role   Mac Address   Priority Version State
----------------------------------------------------------
*3       Master f022.1269.d480    1       1    Ready
2        Member f0d9.1a94.cc1b    1       1    Ready
1        Member f022.ead5.9d2b    1       1    Ready
What a great honor it is be be elected as the Stack Master unfortunately for switch SW3 this isn’t going to last long. We’re going to make sure the switch SW1 has the honor of being the Stack Master by setting it’s priority higher then the other two Switches. Lets also make sure the Switch SW2 has the second highest priority in the stack. Remember the priority on any one Switch in the stack only needs to be 1 greater then its neighboring member order to have a higher priority, but this might not always work out depending on the Base MAC address..!
SW3#configure terminal
SW3(config)#switch 1 priority 3
SW3(config)#switch 2 priority 2
SW3(config)#switch 1 priority 1
SW3(config)#end
SW3#reload
The important thing to take away from the whole election, and priority process is understanding that simply connecting the Stack members together doesn’t guarantee the correct order within the stack. You need to make sure you take the time to understand and verify the stack order.
Reloading A Stack Member
Another powerful feature is the ability to to change a member in the stack, and then reload only that member or members. For example lets say that we wanted to change Switch 3 priority from 1 to 8 we could simply do the following. This however would also make Switch 3 the Stack Master.
SW1#configure terminal
SW1(config)#switch 3 priority 8
SW1(config)#end
SW1#copy running-config startup-config
SW1#reload slot 3
Proceed with reload [confirm] y
Renumbering A Stack Member
Another powerful feature is the ability to renumber a range of ports on the stack that belong to one of the members. Basically this allows you to renumber ports within the stack so they make logical sense from top to bottom, however it does require a reboot of the entire stack. If you have taken the time to make sure the priority of the stack is correct this really isn’t necessary, but lets assume that’s not the case. For example lets say we wanted to renumber all the ports on switch SW3. The following will change the range of ports from Gi3/0/1 – 48 to Gi2/0/1 – 48.
SW1#configure terminal
SW1(config)#switch 3 renumber 2
SW1(config)#end
SW1#copy running-config startup-config
SW1#reload
The following is a console message from the Stack Master Switch SW1 during the reload.
Sep 28 16:40:45: %STACKMGR-4-STACK: Stack Port 1 Switch 1 has changed to state UP
Sep 28 16:40:45: %STACKMGR-4-STACK: Stack Port 2 Switch 1 has changed to state UP
Sep 28 16:40:45: %STACKMGR-4-STACK: Stack Port 3 Switch 1 had changed to state UP
Lets take a look a the Stack members and their priority after make Switch SW1 becomes the Master.
SW1#show switch
Switch/Stack Mac Address : f0bf.ead5.9d80
                                          H/W Current
Switch#  Role   Mac Address   Priority Version State
----------------------------------------------------------
*1       Master f022.ead5.9d2b    3       1    Ready
2        Member fcd9.9694.4300    2       1    Ready
3        Member f022.1269.d480    1       1    Ready
Lets take a final look at the Stack neighbors after the reconfiguration of Stack Master.
SW1#show switch neighbors

Switch # Port 1 Port 2
-------- ------ ------
   1       3       1
   2       2       2
   3       1       3
Cisco 3750 Model Comparison
3750-E
- 10/100/1000 24 and 48 port
- Twin Gig converter module for migrating uplinks from 1 Gig to 10 Gig
- Configurations with up to 20W of PoE on all 48 ports
- StackWise Plus for ease of use and resiliency with 128 Gbps stacking
- Wire rate performance with 68 Gbps nonblocking switching fabric
- Multicast and IPv6 routing and access control list (ACL) in hardware
- Full backward compatibility with the Catalyst the 3750 Series Switches
3750-X
- 10/100/1000 24 and 48 port
- PoE+ or none POE models, and 12 and 24 GE SFP port models
- Four optional uplink network modules with GE or 10GE ports
- Industry first PoE+ with 30W power on all ports
- Dual redundant, modular power supplies and fans
- Media Access Control Security hardware-based encryption
- NetFlow and hardware encryption with the Service Module uplink
- Open Shortest Path First (OSPF) for routed access in IP Base image
- IPv4 and IPv6 routing, Multicast routing, and quality of service QoS
3750 Stack Power
The Cisco Catalyst 3750-X Series introduces the StackPower technology, innovative power interconnect system that allows the power supplies in a stack to be shared as a common resource among all the switches. Cisco StackPower unifies the individual power supplies installed in the switches and creates a pool of power This feature is available in all Cisco Catalyst 3750-X Switches.
I hope you found this post on Stacking Switches helpful and informative. Be sure to let me know what you think by leaving suggestions, and feedback in the comments section below. You can find out more about these and other articles be checking out recent posts and archives. To learn more about me be sure to check out the About page. And as always thanks again for visiting The Packet.
